Adding Framesets to Webworks Help 5.0
Contents
About this Topic
This topic explains how to customize the framesets that contain your Webworks Help 5.0 Content. The information in this article was prompted by a post to wwp-users:
rlenkowicz wrote:
> Does anyone know how to insert a frame above the toolbar in the
> frameset generated by the WebWorks 5.0 format? I would like to insert a
> logo and some external links on the top of the page, and it has to
> appear ABOVE the WebWorks navigation panel.
You can choose between two points when customizing the framesets. To accomplish this task, you will need working knowledge of Javascript functions and <frameset> tags (or be really good flying by the seat of your pants).
What are the Frames in the Set?
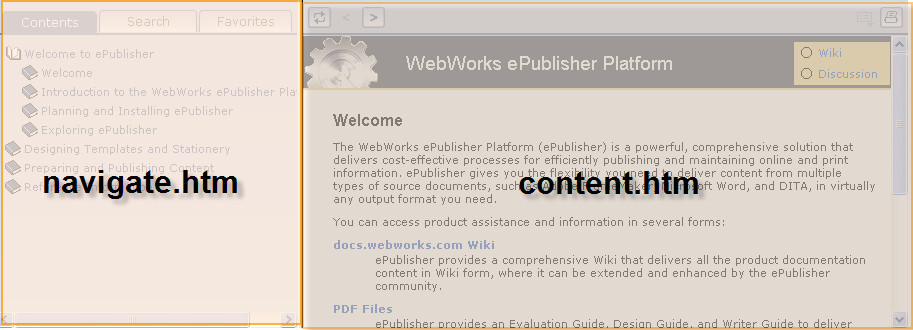
The WWHelp 5.0 page is made up of a number of nested <frameset> elements. The first <frameset> is defined in wwhelp\wwwhimpl\js\wwhelp.htm and references two pages:

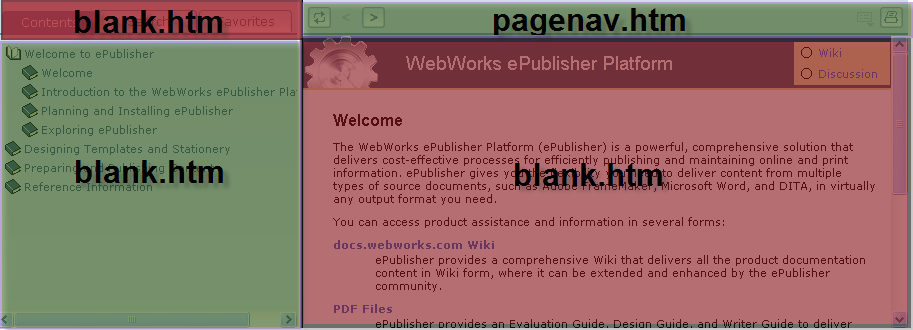
The navigate.htm and content.htm both contain <framesets> that breakdown into the following:

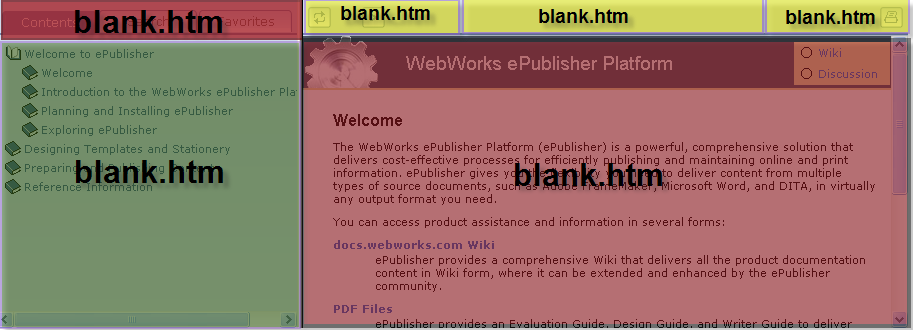
The pagenav.htm also contains a <frameset> with three frames as you see below:

The Webworks transformation pipeline populates each blank.htm file in this set. The directives for populating these framesets are ???.
Changing the WWHelp 5.0 layout requires that you determine which frameset you need to alter. For example, if you want to modify the buttons above the document content, you must work with the pagenav.htm frameset.
Example: Adding a Fixed Pane Below the Document Content
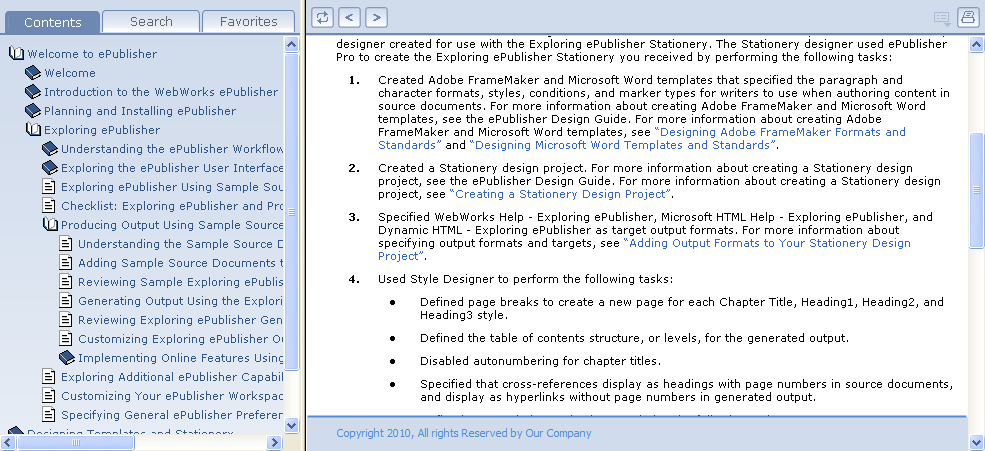
This example illustrates how to add a fixed panel below the document display. In this fixed panel will appear a copyright notice. The following illustrates how the project will appear when completed:

Copy the content.htm File to Your Project
Making this modification will require adding custom code to the content.htm frameset. So, before you begin, you will need to copy the file from Webworks base configuration to your project:
- Go to your Webworks ePublisher installed directory (INSTALLDIR).
Locate the content.htm file in the WebworksHelp 4.0 formats:
C:\Program Files\WebWorks\ePublisher\2010.1\Formats\WebWorks Help 5.0\Files\wwhelp\wwhimpl\common\htm
Copy this file to the same location in your project .
C:\Documents and Settings\yourname\My Documents\ePublisher Pro Projects\yourproject\Formats\WebWorks Help 5.0\Files\wwhelp\wwhimpl\common\html
Edit the content.htm File to Add Another Panel
You are going to add another panel to the frameset defined in content.htm.
Open the yourproject\Formats\WebWorks Help 5.0\Files\wwhelp\wwhimpl\common\html\content.htm file in your favorite editor.
Locate the <frameset> tag starting at line 47.
 <frameset rows="36,*" border="0" frameborder="0" framespacing="0" onresize="WWHContentFrame_HandleResize();"
onkeydown="WWHContentFrame_HandleKeyDown((document.all||document.getElementById||document.layers)?event:null);" onkeypress="WWHContentFrame_HandleKeyPress((document.all||document.getElementById||document.layers)?event:null);" onkeyup="WWHContentFrame_HandleKeyUp((document.all||document.getElementById||document.layers)?event:null);">
  <frame name="" src="pagenav.htm" scrolling="no">
  <frame name="" src="blank.htm" scrolling="auto">

  <noframes>
   <body>
    <p>This page uses frames, but your browser doesn't support them.</p>
   </body>
  </noframes>
You will notice there are two frames in the definition pagenav.htm and blank.htm.
Add another <frame> called copyright.htm to the set.
 <frameset rows="36,*" border="0" frameborder="0" framespacing="0" onresize="WWHContentFrame_HandleResize();"
...
  <frame name="" src="pagenav.htm" scrolling="no">
  <frame name="" src="blank.htm" scrolling="auto">
  <frame name="" src="copyright.htm" scrolling="no">
...
</frameset>
Note: Firefox 3.6.8 and earlier require the src file be in the same directory as content.htm.The file cannot be accessed by a relative URI, such as '../copyright.htm'.
Because you know this panel will contain a single, unchanging line you set the scrolling to no. This means there will be no scroll bar on this panel in the set.
Add another rows attribute to the frameset it will look like this:
<frameset rows="36,*,36" border="0" frameborder="0" framespacing="0" onresize="WWHContentFrame_HandleResize();"
...
</frameset>
Our layout requires that the bottom panel have the same height as the pagenav.htm at the top. We don't have to worry about the width; it takes up the entire available pane width by default.
- Save and close the file.
Create a copyright.htm File
Your new panel will reference a copyright.htm file, so you need to create it. You will create it by copying and renaming a blank.htm file.
- Go to your Webworks ePublisher installed directory (INSTALLDIR).
Locate the blank.htm file in the WebworksHelp 4.0 formats:
C:\Program Files\WebWorks\ePublisher\2010.1\Formats\WebWorks Help 5.0\Files\wwhelp\wwhimpl\common\html
Copy this file to the same location in your project .
C:\Documents and Settings\yourname\My Documents\ePublisher Pro Projects\yourproject\Formats\WebWorks Help 5.0\Files\wwhelp\wwhimpl\common\html
Rename the copied file from blank.htm to copyright.htm.
- Open your new copyright.htm file in your favorite editor.
Search and replace the word blank with copyright.
- Edit the file to add your copyright text in the file itself.
<!DOCTYPE HTML PUBLIC "-//W3C//DTD HTML 4.0//EN" "http://www.w3.org/TR/REC-html40/strict.dtd">
<html>
 <!-- Copyright (c) 2000-2006 Quadralay Corporation.  All rights reserved. -->

 <head>
  <meta http-equiv="content-type" content="text/html">
  <meta http-equiv="charset"      content="UTF-8">
  <!-- MOTW-DISABLED saved from url=(0014)about:internet -->

  <title>copyright.htm</title>

  <style type="text/css">

body{
           bgcolor="#E4E4E4";
           background-image:url('../images/copyrightbg.gif');
           leftmargin: "0" ;
           rightmargin: "0" ;
           topmargin: "0" ;
           bottommargin: "0" ;
           marginwidth: "0" ;
           marginheight:"0";
           }

p.copyright
{
  text-align: left;
  font-size: 12px;
  font-family: "Lucida Sans Unicode", "Lucida Sans", "Lucida Grande", verdana, arial, helvetica, sans-serif;

  color: #808080;
  white-space:nowrap;
}
</style>

 </head>

<body >
         <p class="copyright">
                Copyright 2010. All rights reserved by Our Company.
        </p>
 </body>
</html>
In addition to the copyright material, you can also add some style information to the top of the page. This page uses a file called copyrightbg.gif to get the look and feel of the top nav bar. copyrightbg.gif is a custom image (more about how to do this in the next section).
Save and close your copyright.htm file.
Make a Custom copyrightbg.gif File
Copy the toolsbg.gif image from the appropriate skin folder:
C:\Program Files\WebWorks\ePublisher\2010.1\Formats\WebWorks Help 5.0\Skins\Lobby_Blue\Files\wwhelp\wwhimpl\common\images
Place it in your project:
C:\Documents and Settings\yourname\My Documents\ePublisher Pro Projects\yourproject\Formats\WebWorks Help 5.0\Files\wwhelp\wwhimpl\common\images
Rename the file from toolsbg.gif to copyrightbg.gif.
Using your favorite GUI editor, open copyrightbg.gif.
You may want to zoom in on the image so you can see it better.- Rotate the image 180 degrees so the dark line is at the top.
- Save and close the file.
Regenerate Your Project
You are ready to test your changes. Go ahead and regenerate all the files in your project. You should see your new panel appear just where you want it, on the bottom part of your project.Still having problems, download this ePublisher 2010.1 project and test it for yourself: CustomLayout.zip.
Explanations for Advanced Users
The original explanation for solving this problem was really for more advanced users. There are no working examples. There are two other techniques you can use to alter the framesets. They are explained here.
Customize the Frameset Files
Alternatively, you can alter the help framesets themselves:
WebWorks Help 5.0\Files\wwhelp\wwhimpl\common\html\wwhelp.htm
WebWorks Help 5.0\Files\wwhelp\wwhimpl\js\html\wwhelp.htm
If you do this, you may need to update the "frameset map" specified in "help.js":
WebWorks Help 5.0\Files\wwhelp\wwhimpl\common\scripts\help.js
Search for the method:
function WWHHelp_GetFrameReference(ParamFrameName)
This will contains references to frames by position, so search for "WWHFrame.frames[" and update as required. You should only need to update the top-level frame references.
Customize Through the frameset.htm File
Leverage the entry point defined in the WebWorks Help 5.0 format. There is a frameset file that can be used to "wrap" your help output:
WebWorks Help 5.0\Files\wwhelp\wwhimpl\common\html\frameset.htm
Make your changes there.
To make everything else "just work", you'll also need to override:
WebWorks Help 5.0\Transforms\wwhelp_entry.html
and replace references to "switch.htm" with "frameset.htm".
Replacing the "switch.htm" with "frameset.htm" will make a call to the blank.hml file located in:
WebWorks Help 5.0\Files\wwhelp\wwhimpl\common\html\frameset.htm
If you want to change the size of the blank.htm make your changes in frameset.html
<frameset rows="300,*" border="0" frameborder="0"...
If you want to add custom buttons than you can add those inside the blank.htm
That should do it.
Do keep in mind that you may encounter secondary issues around using the WWHelp API with this configuration.
Additional Notes
Modifying WWHelp's framesets directly, i.e. not using frameset.htm, may require modification to two methods which resolve logical frame names to actual frame instances. These methods are found in the following files:
WebWorks Help 5.0\Files\wwhelp\wwhimpl\common\scripts\help.js
WebWorks Help 5.0\Files\wwhelp\wwhimpl\js\scripts\handler.js
WWHelp uses logical names for each frame which must then be translated into actual DOM frame references. The two functions highlighted are responsible for performing this task.
In the example able, the copyright frame was "appended" to the frameset list, so the default frame references were still valid. Had the implementer chosen to add the copyright frame reference in another location, then it would have been necessary to update the frame resolver code.
help.js - WWHHelp_GetFrameReference()
Topic Only (Single Topic mode)
Logical Frame Name |
Default DOM Path |
WWHFrame |
WWHFrame |
WWHNavigationFrame |
WWHFrame.frames[0] |
WWHContentFrame |
WWHFrame |
WWHPageNavFrame |
WWHFrame.frames[0] |
WWHControlsLeftFrame |
WWHFrame.frames[0].frames[0] |
WWHTitleFrame |
WWHFrame.frames[0].frames[1] |
WWHControlsRightFrame |
WWHFrame.frames[0].frames[2] |
WWHDocumentFrame |
WWHFrame.frames[1] |
Navigation:
Logical Frame Name |
Default DOM Path |
WWHFrame |
WWHFrame |
WWHNavigationFrame |
WWHFrame.frames[0] |
WWHContentFrame |
WWHFrame.frames[1] |
WWHPageNavFrame |
WWHFrame.frames[1].frames[0] |
WWHControlsLeftFrame |
WWHFrame.frames[1].frames[0].frames[0] |
WWHTitleFrame |
WWHFrame.frames[1].frames[0].frames[1] |
WWHControlsRightFrame |
WWHFrame.frames[1].frames[0].frames[2] |
WWHDocumentFrame |
WWHFrame.frames[1].frames[1] |
handler.js - WWHHandler_GetFrameReference()
Navigation (always displayed for this handler):
Logical Frame Name |
Default DOM Path |
WWHTabsFrame |
WWHFrame.frames[0].frames[0] |
WWHPanelFrame |
WWHFrame.frames[0].frames[1] |
WWHPanelNavigationFrame |
WWHFrame.frames[0].frames[1].frames[0] |
WWHPanelViewFrame |
WWHFrame.frames[0].frames[1] (TOC Tab) |